This page applies to Apigee and Apigee hybrid.
View
Apigee Edge documentation.

Overview
Advanced API Security risk assessment continuously evaluates API proxy configurations and calculates security scores to help identify and address vulnerabilities in your APIs.
Risk assessment helps you:
- Enforce consistent security standards across all APIs.
- Detect misconfigurations in API setups.
- Improve your overall security score with recommended actions.
- Quickly investigate and resolve security issues via a centralized dashboard.
In addition to assessing the current risk of each proxy, risk assessment can be used to assess the security posture of your APIs over time. An assessment score that fluctuates could indicate that the API behavior is frequently changing, including proxies deployed without necessary security policies, shared flow modifications via flow hook deployments and FlowCallout policy additions, and target server changes in environment or proxy deployments.
You can access risk assessment either through the Apigee UI, as described on this page, or through the Security scores and profiles API.
See Required roles for risk assessment for the roles needed to perform risk assessment tasks.
To use this feature, you must enable the add-on. If you are a Subscription customer, you can enable the add-on for your organization. See Manage Advanced API Security for Subscription organizations for more details. If you are a Pay-as-you-go customer, you can enable the add-on in your eligible environments. For more information, see Manage the Advanced API Security add-on.
Risk Assessment v1 and v2
Risk Assessment is available in two versions: Risk Assessment v1, which is generally available, and Risk Assessment v2, which is in preview. Use of either version requires the Advanced API Security add-on.
The main feature differences between v1 and v2 are:
- v2 includes:
- Improved reliability, including faster score calculations with recent proxy data
- Score calculation without the need to first attach a security profile to an environment
- Simplified score presentation, based on a 0% to 100% scale
- The concept of assessment check weights, which v1 does not support. See Risk assessment concepts and scoring.
- Additional assessments over v1, which check more policies when calculating scores.
For example, v1 supports five authorization and authentication-related policies while v2 supports eight. Also,
v2 includes a Traffic Management category with associated policies and performs additional
checks in policies, including for the
continueOnErrorattribute. - Checks of nested shared flows and flow hooks to five levels of nesting. v1 does not evaluate policies included via shared flow chaining.
- Replacement of target scores (target server scores) with proxy-based assessments and recommendations. If a Target is used in a proxy, the security scores for that proxy include the score for the Target Server as well.
- Custom profiles using the new v2 assessment checks as well as the
google-defaultsystem profile.
- v2 does not support:
- Source assessment based on abusive traffic.
- Metrics and Monitoring are not supported at this time.
Risk Assessment v2
This section describes Risk Assessment v2, the new version of Risk Assessment. Some Risk Assessment concepts and behaviors differ between v1 and v2. For usage with Risk Assessment v1, see Risk Assessment v1 instead.
Risk Assessment v2 concepts and scoring methodology
Risk assessment security scores assess the security risk of your APIs based on the scoring of security assessments and weights in a security profile.
Risk assessment scoring is based on:
- Assessments and assessment checks: The individual checks performed against proxies, and
on which proxies are scored. Each check also has a weight, which gives a check more or
less significance when assessed against a proxy. Weights are set at minor, moderate, or
major for each check. Each weight has a point value which is used to calculate a score:
- Minor: 1
- Moderate: 5
- Major: 15
- Security profile: A collection of assessment checks, against which deployed proxies in an environment are assessed.
- Security score: The score for a proxy after assessment against a security profile.
The score is a value between 0% and 100%. 100% indicates that the proxy is fully compliant with the assessment and no risks were found based on the assessment checks.
The security score is essentially the total of all points awarded for passed assessment checks divided by the total potential points in the profile. The score is a weighted average, so the more policies the security profile has, the less impact each assessment check has on the security score.
The assessment check weight also impacts the security score. Higher weights have more impact on the calculation and lower weights have less impact, using the point value for each weight. If the weights are equal for all assessment checks in the security profile (such as when all assessment checks have a medium weight) then the security score is calculated as a regular average. - Severity: A severity value for each assessed proxy, based on the security score. The potential severity values are high (0-50%), medium (51-90%), low (91-99%), and minimal (100%/no risk found based on the assessments in the assigned security profile).
Assessment categories and checks
This table shows the assessment categories and individual checks that can be part of security profiles. It also shows recommendations on how to address failed assessments for each.
| Assessment category | Description | |||||||||||||||||||||||||||||||||
|---|---|---|---|---|---|---|---|---|---|---|---|---|---|---|---|---|---|---|---|---|---|---|---|---|---|---|---|---|---|---|---|---|---|---|
| Auth | "Auth" means both authorization and authentication in this case. Auth assessments
check to see if you have an authorization and authentication policies in place and if the
continueOnError attribute for auth policies is set to false.
|
|||||||||||||||||||||||||||||||||
| CORS | Checks whether a CORS policy or CORS header in the AssignMessage policy are present.
|
Mediation | Checks whether a mediation policy is enabled.
|
|||||||||||||||||||||||||||||||
| Target | Checks whether target server protections are used. For information on target server
configuration, see
Load
balancing across backend servers.
|
|||||||||||||||||||||||||||||||||
| Threat | Checks to see if threat prevention policies are used.
|
|||||||||||||||||||||||||||||||||
| Traffic | Checks to see if you have traffic management policies in place.
|
Policy attachment and proxy security scores
For proxy assessments, security scores are based on the policies you are using. How those policies are assessed depends on whether and how they are attached to flows:
- Only policies that are attached to a flow (preflow, conditional flow, post flow in proxies, or shared flow) affect scores. Policies that are not attached to any flow do not affect scores.
- Proxy scores take into account shared flows a proxy calls via flow hooks and FlowCallout policies in the proxy, provided the FlowCallout policy is attached to a flow. However, if the FlowCallout is not attached to a flow, policies from its linked shared flow do not affect security scores.
- Chained shared flows are evaluated up to five levels deep. Any policies included directly in the proxy and in the first five levels of shared flows are counted towards the security score.
- For policies attached to conditional flows, security scores only take into account whether the policies are present; it does not take into account whether or how the policies are enforced at runtime.
Security profiles v2
A security profile is a set of
security assessments and weights
to score API proxies against. You can use either Apigee's default
security profile, called google-default, or you can create a
custom security profile
that contains only the security categories and weights you want to assess.
When working with security profiles or creating custom security profiles, note that multiple assessment checks within a category are assessed individually.
For example, if there are three authentication policy checks in a security profile and the assessed proxy includes one of the three, the assessment score will include full points for the one found policy and zero points for the other two policies which are not present. In this example, the assessed proxy would not receive full points for authentication policy checks even though it does include an authentication policy. Be careful about security score interpretation and security profile design given this behavior.
Default security profile
Advanced API Security provides a default security profile that contains all of the assessments. When you use the default profile, security scores are based on all of the categories.
The default security profile, google-default, can't be edited or deleted.
Custom security profile
You can create custom security profiles that include only your chosen assessment checks and weights to evaluate against proxies. For instructions on creating and using custom security profiles from the Apigee UI, see Manage custom profiles in the Apigee UI.
For custom security profiles:
- The profile name (also called the profile ID) is required and is shown in the summary table when listing profiles. The name must be 1 to 63 characters, which can be lower case letters, numbers 0-9, or hyphens. The first character must be a lower case letter. The last character must be a lower case letter or number. Custom security profiles must have unique names and can't duplicate existing profile names.
- The profile description is optional and can't exceed 1,000 characters.
Limitations and known issues on security scores v2
Security scores have the following limitations and known issues:
- Security scores are only generated if an environment has deployed proxies.
- Newly deployed proxies and newly enabled organizations and environments do not immediately show scores.
- For custom profiles, you can create a maximum of 100 custom profiles per organization.
- Notification of new assessment calculations and scores is not supported at this time.
Data delays
The data that Advanced API Security security scores have the following processing windows before results are available:
- When you enable Advanced API Security in an organization for the first time, it takes time for the scores for existing proxies and targets to be reflected in an environment. As a guideline, expect 30 to 90 minutes for Subscription organizations and less time for Pay-as-you-go organizations.
- New events related to proxies (deployment and undeployment) and targets (create, update, delete) in an environment take at least 60 seconds and up to 5 minutes (for very large environments) to reflect in the environment's score.
View risk assessments in the Apigee UI
The Risk Assessment page displays scores that measure the security of your API in each environment.
To open the Risk Assessment page:
- Open the Apigee UI in Cloud console.
- Select Advanced API Security > Risk assessment.
This displays the Risk Assessment page:

The page has these sections:
- Environment: Select the environment on which to view assessments.
- Security profile: Select the default profile (
google-default) or a custom profile, if available. See Security profiles for information on security profiles. - Deployed proxies by severity: Once the environment is set, the page shows a summary of severities across proxies in that environment. See Risk assessment concepts and scoring.
- Assessment details: Shows the security profile, assessment date and time, total
assessed configurations, and total deployed proxies for the selected environment. The total
assessed configurations count reflects the total number of "checks" performed. This count
might be higher than the number of assessments in a profile; some assessments,
such as verifying that the "continueOnError” attribute is set to
falsealso check if the related policies are in place and enabled. - Deployed proxies: A summary of deployed proxies in the environment and their risk
assessment scores:
- Proxy: Name of the proxy.
- Severity: The risk assessment severity for the proxy. See Security scores and severities for information.
- Score: The risk assessment score for the proxy. See Risk assessment concepts and scoring for information.
- Revision: The proxy revision on which the score was assessed.
- Failed assessments by weight: The number of failed assessments grouped by the assessment weight.
- Recommendations: Specific recommendations for improving the score on the proxy. Click the number to see the recommendations.
Manage custom profiles in the Apigee UI
This section shows how to view, create, edit, and delete custom profiles using the Apigee UI. Note the limitations on custom profiles listed in Limitations on security scores.
Start by Viewing risk assessments in the Apigee UI.
Create and edit custom profiles
On the Risk Assessment screen, select the Security Profiles tab. To edit an existing profile, click the profile name to see the profile details and then Edit. Or, you can select Edit from the Actions menu in the row for that profile.
To create a new custom profile, click + Create on the security profile list.

When creating or editing a custom profile, you can set these values:
- Name: The name of the security profile. Make sure this is unique for the project.
- Description: (Optional). A description for the security profile.
- Assessment check(s) and Assessment weight(s): One or more assessment checks to evaluate against proxies and a weight for each. See Risk assessment concepts and scoring for a list of the available assessment checks. To add additional assessment checks and weights to the profile, click + Add. To delete a check/weight pair, click the trash icon in the row for that pair.
Duplicate profiles
To duplicate an existing profile (to create a new custom profile), select Duplicate from the Actions menu in the row for that profile or click the profile name from the profiles list to see the profile metadata, and then click Duplicate.
The name of the new custom profile can't match the duplicated profile. See Custom security profile for security profile naming requirements.
Delete custom profiles
To delete an existing custom profile, select Delete from the Actions menu in the row for that profile or click the profile name from the profiles list to see the profile metadata, and then click Delete.
Note that you cannot delete the default system profile (google-default).
Deleting a custom profile is effective immediately and removes the ability to assess proxies against that profile or see previous assessments against that custom profile.
Risk Assessment v1
This section describes Risk Assessment v1. For information on Risk Assessment v2, see Risk Assessment v2 instead.
Security scores
Security scores assess the security of your APIs, as well as their security posture over time. For example, a score that fluctuates a lot could indicate that the API behavior is frequently changing, which might not be desirable. Changes in an environment that could cause the score to drop include:
- Deploying many API proxies without the necessary security policies.
- A spike in abuse traffic from malicious sources.
Observing changes to your security scores over time provides a good indicator of any unwanted or suspicious activity in the environment.
Security scores are calculated based on your security profile, which specifies the security categories you want your scores to evaluate. You can use Apigee's default security profile, or you can create a custom security profile that includes only the security categories that are most important to you.
Security scores assessment types
There are three assessment types that contribute to the overall security score calculated by Advanced API Security:
Source assessment: Assesses the detected abuse traffic, using the Advanced API Security detection rules. "Abuse" refers to requests sent to the API for purposes other than what the API is intended for.
- Proxy assessment: Assesses how well proxies have implemented
various security policies in the following areas:
- Mediation: Check if one of the following mediation policies is configured for all proxies in the environment: OASValidation or SOAPMessageValidation.
- Security:
- Authorization: Checks if one of the following authorization policies is configured for all proxies in the environment:
- CORS: Checks if CORS is configured.
- Threat: Checks if one of the following policies is configured for all proxies in the environment: XMLThreatProtection or JSONThreatProtection.
See How policies affect proxy security scores for more information.
- Target assessment: Checks if mutual transport layer security (mTLS) is configured with the target servers in the environment.
Each of these assessment types is assigned a score of its own. The overall score is the average of the scores of the individual assessment types.
How policies affect proxy security scores
For proxy assessments, security scores are based on the policies you are using. How those policies are assessed depends on whether and how they are attached to flows:
- Only policies that are attached to a flow (preflow, conditional flow, post flow in proxies, or shared flow) affect scores. Policies that are not attached to any flow do not affect scores.
- Proxy scores take into account shared flows a proxy calls via flow hooks and FlowCallout policies in the proxy, provided the FlowCallout policy is attached to a flow. However, if the FlowCallout is not attached to a flow, policies from its linked shared flow do not affect security scores.
- Shared flow chaining is not supported. Policies included via shared flow chaining are not assessed when calculating security scores.
- For policies attached to conditional flows, security scores only take into account whether the policies are present; it does not take into account whether or how the policies are enforced at runtime.
Security profiles
A security profile is a set of security categories (described below) that you want your APIs to be scored on. A profile can contain any subset of the security categories. To view security scores for an environment, you first need to attach a security profile to the environment. You can use either Apigee's default security profile, or you can create a custom security profile that contains only the security categories of importance to you.
Default security profile
Advanced API Security provides a default security profile that contains all of the security categories. If you use the default profile, security scores will be based on all the categories.
Custom security profile
Custom security profiles let you base your security scores on only those security categories you want included in the score. See Create and edit security profiles to learn how to create a custom profile.
Security categories
Security scores are based on an assessment of the security categories described below.
| Category | Description | Recommendation |
|---|---|---|
| Abuse | Checks for abuse, which includes any requests sent to the API for purposes other than what it is intended for, such as high volumes of requests, data scraping, and abuse related to authorization. | See Abuse recommendations |
| Authorization | Checks to see if you have an authorization policy in place. | Add one of the following policies to your proxy: |
| CORS | Checks to see if you have a CORS policy in place. | Add a CORS policy to your proxy. |
| MTLS | Checks to see if you have configured mTLS (Mutual transport layer security) for the target server. | See Target server mTLS configuration. |
| Mediation | Checks to see if you have a mediation policy in place. | Add one of the following policies to your proxies: |
| Threat | Checks to see if you have a threat protection policy in place. | Add one of the following policies to your proxies: |
Limitations on security scores v1
Security scores have the following limitations:
- You can create up to 100 custom profiles per organization.
- Security scores are only generated if an environment has proxies, target servers, and traffic.
- Newly deployed proxies do not immediately show scores.
Data delays
The data that Advanced API Security security scores are based on have the following delays, due to the way the data is processed:
- When you enable Advanced API Security in an organization, it can take up to 6 hours for the scores for existing proxies and targets to be reflected in an environment.
- New events related to proxies (deployment and undeployment) and targets (create, update, delete) in an environment can take up to 6 hours to reflect in the environment's score.
- Data flowing into the Apigee Analytics pipeline has a delay of up to 15 to 20 minutes on average. As a result source scores abuse data has processing delay around 15 to 20 minutes.
Open the Risk assessment page
The Risk assessment page displays scores that measure the security of your API in each environment.
It may take a few minutes for the Risk assessment page to load. The page will take longer to load for environments with a high volume of traffic and a large number of proxies and targets.
Apigee in Cloud console
To open the Risk assessment page:
- Open the Apigee UI in Cloud console.
- Select Advanced API Security > Risk assessment.
This displays the Risk assessment page:
The page has two tabs, which are described in the following sections:
- Security Scores: View security scores.
- Security Profiles: View, create and edit security profiles.
View security scores
To view security scores, click the Security Scores tab.
Note that no scores are computed for an environment until you attach a security profile, as described in Attach a security profile to an environment. Apigee provides a default security policy, or you can create a custom profile, as described in Create and edit security profiles.
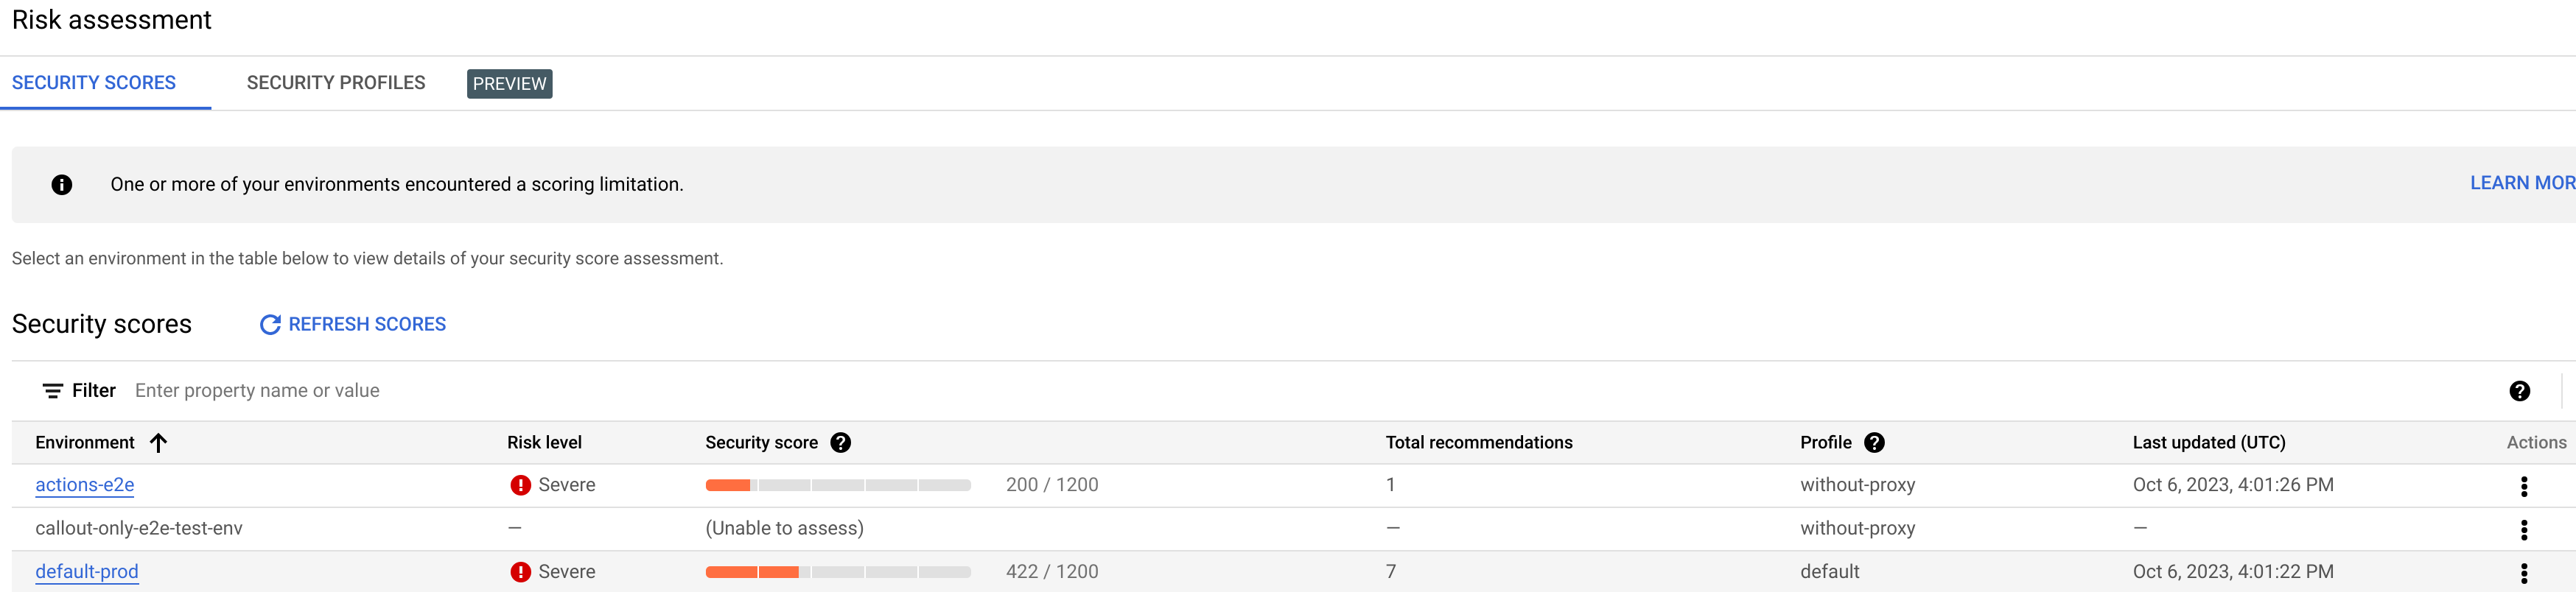
The Security scores table displays the following columns:
- Environment: The environment in which the scores are calculated.
- Risk level: The risk level for the environment, which can be low, moderate, or severe.
- Security score: The total score for the environment, out of 1200.
- Total recommendations: The number of recommendations provided.
- Profile: The name of the attached security profile.
- Last updated: The latest date on which security scores were updated.
- Actions: Click the three-dot menu in the row for the environment to perform
the following actions:
- Attach profile: Attach a security profile to the environment.
- Detach profile: Detach a security profile from the environment.
Attach a security profile to an environment
To view security scores for an environment, you must first attach a security profile to the environment as follows:
- Under Actions, click the three-dot menu in the row for the environment.
- Click Attach profile.
- In the Attach Profile dialog:
- Click the Profile field and select the profile you wish to attach. If you have not created a custom security profile, the only available profile is default.
- Click Assign.
When you attach a security profile to an environment, Advanced API Security immediately starts assessing and scoring it. Note that it may take a few minutes for the score to be displayed.
The overall score is calculated from the individual scores in the three assessment types:
- Source assessment
- Proxy assessment
- Target assessment
Note that all scores are in the range 200 - 1200. Higher assessment scores indicate lower security risk.
View scores
Once you have attached a security profile to an environment, you can view the scores and recommendations in the environment. To do so, click the row for the environment in the main Security Scores page. This displays the scores for the environment, as shown below:

The view displays four tabs:
Overview
The Overview tab displays the following:
- Top highlights for each assessment:
- Proxy: Shows the top recommendation for proxies in the environment. Click Edit Proxy to open the Apigee Proxy Editor, where you can implement the recommendation.
- Target: Shows the top recommendation for targets in the environment. Click View Target Servers to open the Target Servers tab in Management > Environments page in the Apigee UI.
- Source: Shows the detected abuse traffic. Click Detected Traffic to view the Detected traffic tab in the Abuse detection page.
- Summaries for Source Assessment, Proxy Assessment, and Target Assessment,
including:
- The latest score for each assessment type.
- The Source Assessment pane displays detected abuse traffic and IP address count.
- The Proxy Assessment and Target Assessment panes display the risk level for those assessments.
- Click View Assessment Details in any of the summary panes to see the details for that assessment type:
- Assessment history, which displays a graph of the daily total scores for the environment over a recent time period, which you can choose to be 3 days or 7 days. By default the graph shows 3 days. The graph also shows the average total score over the same period.
Note that a score is only computed for the assessment type if there is something to assess. For example, if there are no target servers, no score will be reported for Targets.
Source assessment
Click the Source Assessment tab to view the assessment details for the environment.

Click the expand icon to the right of Assessment details to view a graph of the source assessment over a recent time period, which you can choose to be 3 days or 7 days.
The Source pane displays a table with the following information:
- Category: The category for the assessment.
- Risk level: The risk level for the category.
- Security score: The security score for the abuse category.
- Recommendations: The number of recommendations for the category.
Source details
The Source details pane displays details of detected abuse traffic in the environment, including:
- Traffic details:
- Detected traffic: The number of API calls originating from an IP address that has been detected as a source of abuse.
- Total traffic: The total number of API calls made.
- Detected IP address count: The number of distinct IP addresses that have been detected as sources of abuse.
- Observation start time (UTC): The start time in UTC of the period during which traffic was monitored.
- Observation end time (UTC): The end time in UTC of the period during which traffic was monitored.
- Assessment date: The date and time the assessment was made.
- The recommendation for improving the score. See Abuse recommendations for further recommendations on handling abuse traffic.
To create a security action to deal with issues raised by the source assessment, click the Create Security Action button.
Proxy assessment
The API proxy assessment calculates scores for all proxies in the environment. To view the proxy assessment, click the Proxy Assessment tab:

The Proxy pane displays a table with the following information:
- Proxy: The proxy being assessed.
- Risk level: The risk level for the proxy.
- Security score: The security score for the proxy.
- Needs attention: The assessment categories that should be addressed to improve the score for the proxy.
- Recommendations: The number of recommendations for the proxy.
Click the name of a proxy in the table to open the Proxy Editor, where you can make recommended changes to the proxy.
Proxy recommendations
If a proxy has a low score, you can view recommendations for improving it in the Recommendations pane. To view the recommendations for a proxy, click in the Needs attention column for the proxy in the Proxy pane.
The Recommendations pane displays:
- Assessment date: The date and time the assessment was made.
- The recommendation for improving the score.
Target assessment
The target assessment calculates a mutual transport layer security (mTLS) score for each target server in the environment. Target scores are assigned as follows:
- No TLS present: 200
- One-way TLS present: 900
- Two-way or mTLS present: 1200
To view the target assessment, click the Target Assessment tab:

The Target pane displays the following information:
- Target: The name of the target.
- Risk level: The risk level for the target.
- Security score: The security score for the target.
- Needs attention: The assessment categories that should be addressed to improve the score for the target.
- Recommendations: The number of recommendations for the target.
Click the name of a target in the table to open the Target Servers tab in Management > Environments page in the Apigee UI, where you can apply the recommended actions to the target.
Target recommendations
If a target server has a low score, you can view recommendations for improving it in the Recommendations pane. To view the recommendations for a target, click in the Needs attention column for the target in the Target pane.
The Recommendations pane displays:
- Assessment date: The date and time the assessment was made.
- The recommendation for improving the score.
Create and edit security profiles
To create or edit a security profile, select the Security Profiles tab.

The Security Profiles tab displays a list of security profiles, including the following information:
- Name: The name of the profile.
- Categories: The security categories included in the profile.
- Description: The optional description of the profile.
- Environments: The environments the profile is attached to. If this column is blank, the profile is not attached to any environments.
- Last updated (UTC): The last date and time the profile was updated.
- Actions: A menu with the following items:
View a security profile's details
To view a security profile's details, click its name in the row for the profile. This displays the details of the profile as shown below.
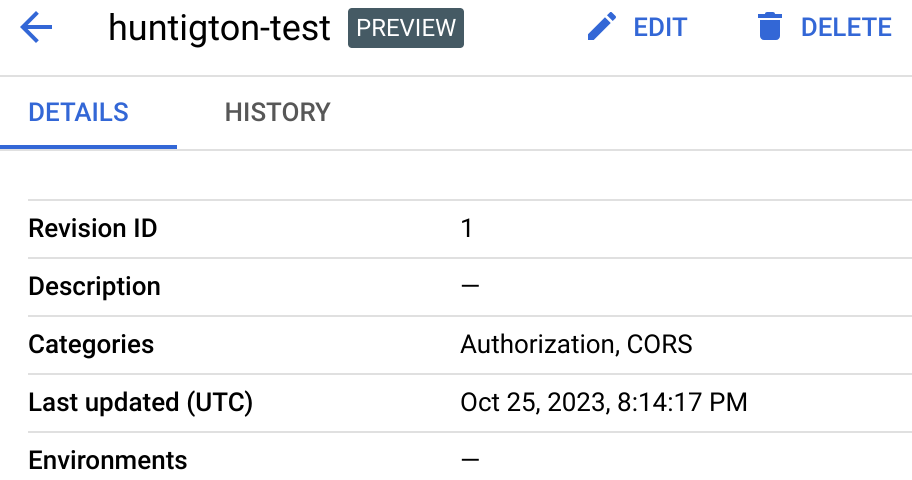
The first row in the Details tab displays the Revision ID: the latest revision number of the profile. When you edit a profile and change its security categories, the revision ID is increased by 1. However, just changing the profile's description does not increase the revision ID.
The rows below that display the same information shown in the row for the profile in the Security Profiles tab.
The profile details view also has two buttons labeled Edit and Delete, which you can use to edit or delete a security profile.
History
To view the history of the profile, click the History tab. This displays a list of all revisions of the profile. For each revision, the list displays:
- Revision ID: The revision number.
- Categories: The security categories included in that revision of the profile.
- Last updated (UTC): The date and time in UTC when the revision was created.
Create a custom security profile
To create a new custom security profile:
- Click Create at the top of the page.
- In the dialog that opens, enter the following:
- Name: The name of the profile. The name must consist of 1 to 63 lowercase letters, numbers, or hyphens, and must start with a letter and end with a letter or number. The name must be different than the name of any existing profile.
- (Optional) Description: A description of the profile.
- In the Categories field, select the assessment categories you want to include in the profile.
Edit a custom security profile
To edit a custom security profile:
- At the end of the row for the security profile, click the Actions menu.
- Select Edit.
- In the Edit security profile page, you can change:
- Description: The optional description of the security profile.
- Categories: The security categories selected for the profile. Click the drop-down menu and change the selected categories by selecting or deselecting them in the menu.
- Click OK.
Delete a custom security profile
To delete a security profile, click Actions at the end of the row for the profile and select Delete. Note that deleting a profile also detaches it from all environments.
Classic Apigee UI
To open the Security scores view:
- Open the Classic Apigee UI.
- Select Analyze > API Security > Security Scores.
This displays the Security scores view:

Note that no scores are computed for an environment until you attach a security profile to the environment. Apigee provides a default security policy, or you can create a custom profile using the Apigee API. See Use a custom security profile for details.
In the picture above, no security profile has been attached to to the integration
environment, so the
Profile Name column displays Not set for that environment.
The Security scores table displays the following columns:
- Environment: The environment in which the scores are calculated.
- Latest Score: The latest total score for the environment, out of 1200.
- Risk Level: The risk level, which can be low, moderate, or severe.
- Total Recommendations: The number of recommendations provided. Each recommendation corresponds to a row in the Needs Attention table.
- Profile Name: The name of the security profile.
- Assessment Date: The latest date on which security scores were calculated.
Attach a security profile to an environment
To view security scores for an environment, you must first attach a security profile to the environment as follows:
- Under Actions, click the three-dot menu in the row for the environment.
- Click Attach profile.
- In the Attach Profile dialog:
- Click the Profile field and select the profile you wish to attach. If you have not created a custom security profile, the only available profile is default.
- Click Assign.
When you attach a security profile to an environment, Advanced API Security immediately starts assessing and scoring it. Note that it may take a few minutes for the score to be displayed.
The image below shows the Security Scores view with an environment that has the default security profile attached:

The row for the environment now displays the latest security score, risk level, the number of recommendations for security actions to take, and the score's Assessment Date.
The overall score is calculated from the individual scores in the three assessment types:
- Source assessment
- Proxy assessment
- Target assessment
Note that all scores are in the range 200 - 1200. The higher the score, the better the security assessment.
View scores
Once you have attached a security profile to an environment, you can view the scores and recommendations in the environment. To do so, click the row for the environment in the main Security Scores view. This displays the scores for the environment, as shown below:

The view displays:
- The latest scores for Sources, Proxies, and Targets. Click View Assessment Details in any of these panes to see the assessment for that type.
- Environment Score History, which displays a graph of the daily total scores for the environment over the past 5 days, as well as the average total score over the same period.
- The Needs Attention table, which lists assessment types of your APIs in which you can improve security.
Note that a score is only computed for the assessment type if there is something to assess. For example, if there are no target servers, no score will be reported for Targets.
The following sections describe how to view the assessments for each type:
The Needs Attention table
The Needs Attention table, shown above, lists the API categories whose scores are below 1200, along with:
- The latest score for the category
- The risk level for the category, which can be low, moderate, or severe
- The assessment date
- The assessment type
View recommendations
For each row in the table, Advanced API Security provides a recommendation for improving the score. You can view the recommendations in the Assessment details views for each of the types, Sources, Proxies, or Targets, as described in the following sections:
You can open an Assessment details view in either of the following ways:
- Click View Assessment Details in any of the panes in the main Security Scores view.
- In the Needs Attention Table:
- Expand the category group in the table:

- Click the category for which you want to view the recommendation. This opens the assessment details view corresponding to the recommendation.
- Expand the category group in the table:
Source assessment
The source assessment calculates an abuse score for the environment. "Abuse" refers to requests sent to the API for purposes other than what the API is intended for.
To view the source assessment, click View in the Sources pane to open the API Source Assessment view:

The Source Score History displays the scores over the last 5 days, along with their average and the latest score. The Assessment details table displays the latest individual scores for the categories of the assessment.
Source recommendations
If a category has a low score, you can view recommendations for improving it. To view a recommendation for the abuse category, click its row in the Assessment details table. This displays the recommendation in the Recommendations pane.

To drill down on the details of the abuse, click View Details. This opens the Detected Traffic view in the Abuse detection page. The Detected Traffic view displays detailed information about detected abuse.
Below the View Details line, the Recommendations pane displays:
- The recommendation: "Block or allow traffic identified by abuse detection." is displayed.
- The Actions row displays a link to documentation for abuse recommendations.
Proxy assessment
The API proxy assessment calculates scores for all proxies in the environment. To view the proxy assessment, click View in the Proxies pane to open the API Proxy Assessment view:

The Proxy Score History displays the scores over the last 5 days, along with their average and the latest score. The Assessment details table displays the latest individual scores for the categories of the assessment.
Proxy recommendations
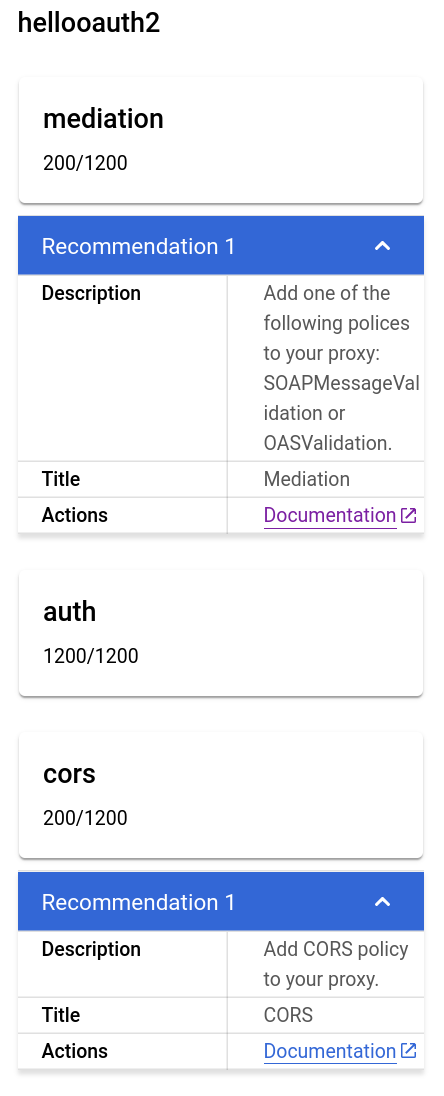
If a proxy has a low score, you can view recommendations for improving it. For example, to view recommendations for the hellooauth2 proxy, click its row in the Assessment details table. This displays the recommendations in the Recommendations pane. Two of them are shown below.
Target assessment
The target assessment calculates an mTLS score for each target server in the environment. Target scores are assigned as follows:
- No TLS present: 200
- One-way TLS present: 900
- Two-way or mTLS present: 1200
To view the target assessment, click View in the Targets pane to open the API Target Assessment view:

The Target Score History displays the scores over the last 5 days, along with their average and the latest score. The Assessment details table displays the latest individual scores for the categories of the assessment.
Target recommendations
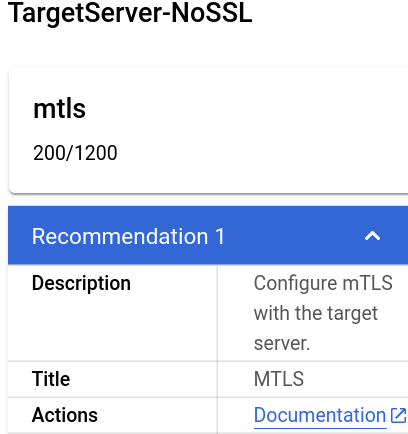
If a target server has a low score, you can view recommendations for improving it. To view the assessment of a target server, click its row. This displays the recommendation in the Recommendations pane.
Abuse recommendations
If the source score is low, Apigee recommends that you review the IPs for which abuse has been detected. Then, if you agree that the traffic from those IPs is abusive, use the Security actions page to block requests from IP addresses that are sources of abuse traffic.
To get more information about the abuse, you can use either of the following resources:
- The Abuse detection page, which displays information about security incidents involving abuse traffic.
- The Security reports page.
For example, you can create the following reports:
- IP addresses of bots, as described in Example: bot IP Addresses report.
- Bot traffic by bot_reason, as described in Example: bot traffic by bot reason report.